

Android Notification All-in-One
Notification is now part of everyone’s daily life in the 21st century.


Notification is one of the most useful features in smartphones nowadays and users receive hundreds of notifications every day from messaging apps, news apps and games, etc. A good notification can increase user motivation on using your app.
Android provides developers with lots of options and features to provide a good UI/ UX to users and detects user interaction with each notification. As an Android developer, we should know more about the possibilities of notification layout and its functionalities.
I have developed an Android app for a few years and am going to include some of my experience and tricks faced in the past. Hope you would find this article useful. Let’s start!
Widgets in Notification
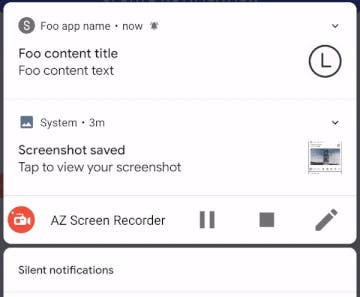
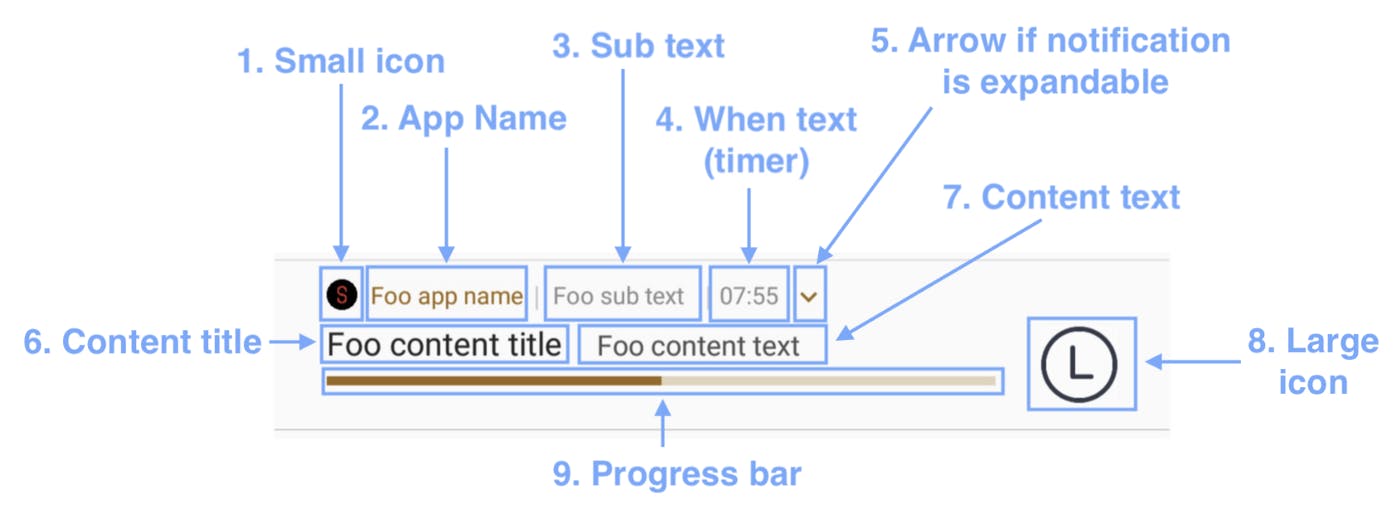 There are totally 9 different widgets within each notification ( instead of 6 stated in official documentation ):
- Small icon (usually app icon) — Bear in mind the tint colour and see the “Tricks on Notification icon” section for more details
- App name — Set at
AndroidManifest.xml - Sub text — Set with
setSubText(subText: String) - When text — Set with
setWhen(),setShowWhen()andsetUsesChronometer() - Arrow button
- Content title — Set with
setContentTitle(title: String) - Content text — Set with
setContentText(content: String) - Large icon — Set with
setLargeIcon(bitmap: Bitmap) - Progress bar — Set with
setProgress(max: Int, progress: Int, isDeterminate: Bool)
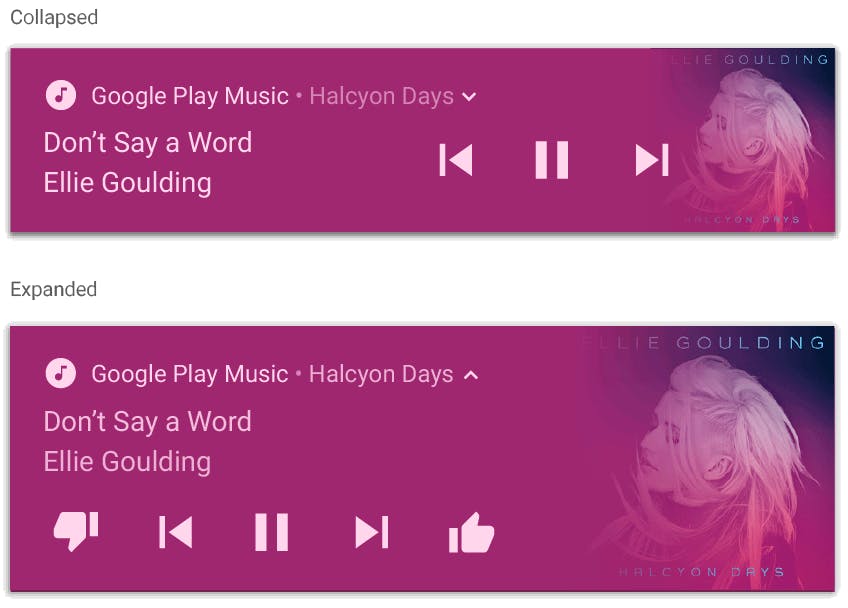
5 built-in Notification Styles
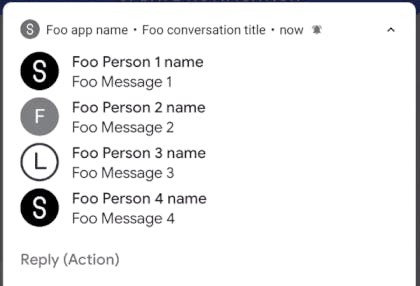
There are totally 5 existing notification styles provided by Android. They can provide a different UI / UX to user for showing a conversation, a paragraph of text, an image, inbox record and a media controller:
- MessagingStyle Notification
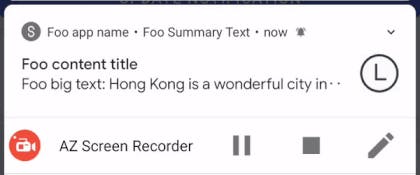
- BigTextSytle Notification
- BigPictureStyleNotification
- InboxStyleNotification
- MediaStyleNotification
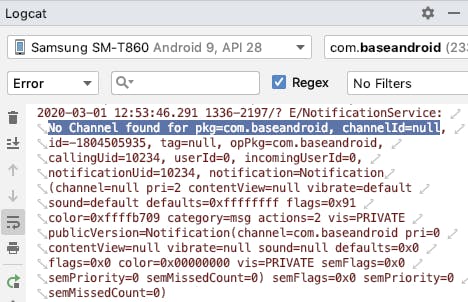
Important update at Android O (API 26) in 2017
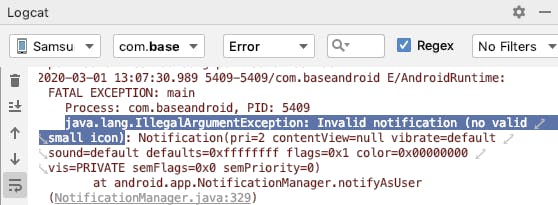
NotificationChannel was newly introduced at Android O (API 26) in 2017. Every notification must be attached to a NotificationChannel else the notification cannot be sent to the Notification Drawer with an error log shown below:
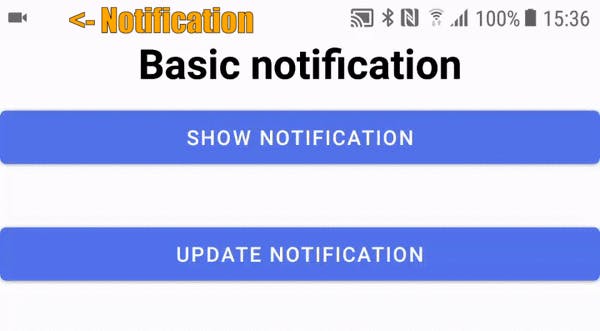
Basic Notification
val notificationManager = getSystemService(Context.NOTIFICATION_SERVICE) as NotificationManager

val CHANNEL_ID = "CHANNEL_ID"
val channel = NotificationChannel(CHANNEL_ID, "CHANNEL_NAME", NotificationManager.IMPORTANCE_HIGH)
notificationManager.createNotificationChannel(channel)

val notificationBuilder = NotificationCompat.Builder(App.context, CHANNEL_ID).also {
  it.setContentTitle("Foo content title")
  it.setContentText("Foo content text")
  it.setSmallIcon(R.drawable.ic_small_s) // Icon shown at the status bar
}

val notification = notificationBuilder.build()
val notificationId = System.currentTimeMillis().toInt()
notificationManager.notify(notificationId, notification)
NotificationManager is one of the Android system service which can manage the notifications sent to the Notification Drawer. It can carry out CRUD (Create, Read, Update and Delete) to all the sent notifications. Developer can send a notification to Notification Drawer by the method notify(uniqueNotificationId: Int, notification: Notification).
The most basic notification simply consists of:
- Compulsory notification icon (small icon)
- (Optional) title string
- (Optional) content string
Bear in mind, the notification icon must be declared for each Notification object, else the app will crash with the following runtime error:
Tricks on Notification icon
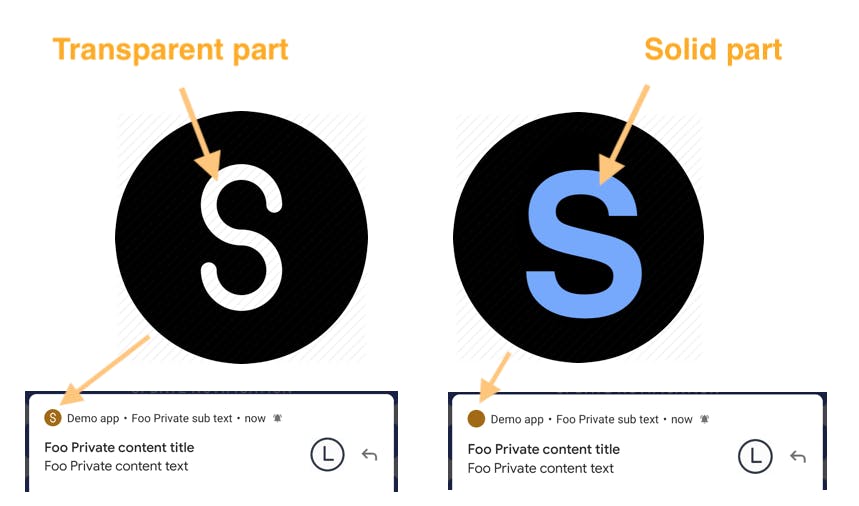
Different manufacturers would have different implementation on the small notification icon. Some of the manufacturers would add a layer of tint color over the notification icon, i.e. all non-transparent area will be painted with a color set by setColor(colorRes: Int). The above screenshot was taken on a Pixel 3 device (Designed by Google) running at API 29. Therefore, designer should outline the app logo with transparent lines instead of using different color.
Color (Tint color)
val notification = Notification.Builder(App.context, CHANNEL_ID).also {
  it.setColor(ContextCompat.getColor(this, R.color.amber))
}.build()
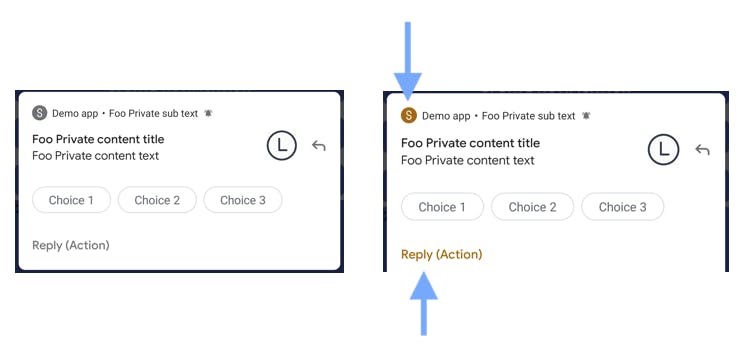
The color property of the Notification.Builder affects on the color on both small icon and RemoteInput action button.
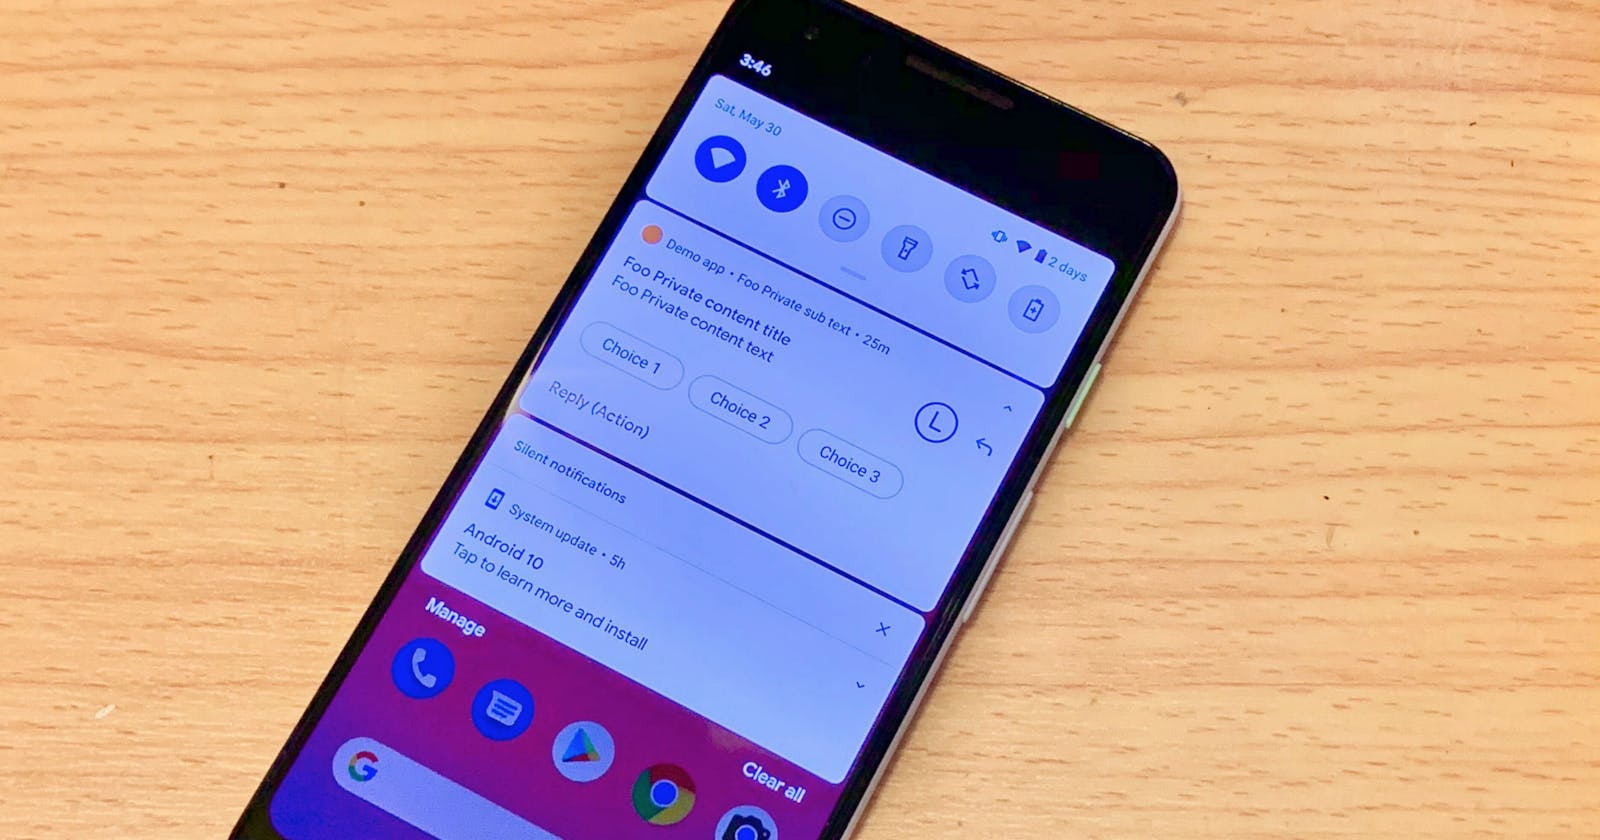
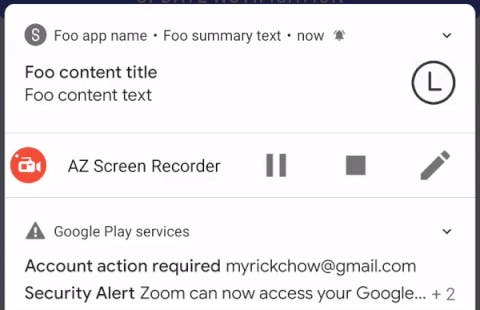
Privacy — Set Visibility
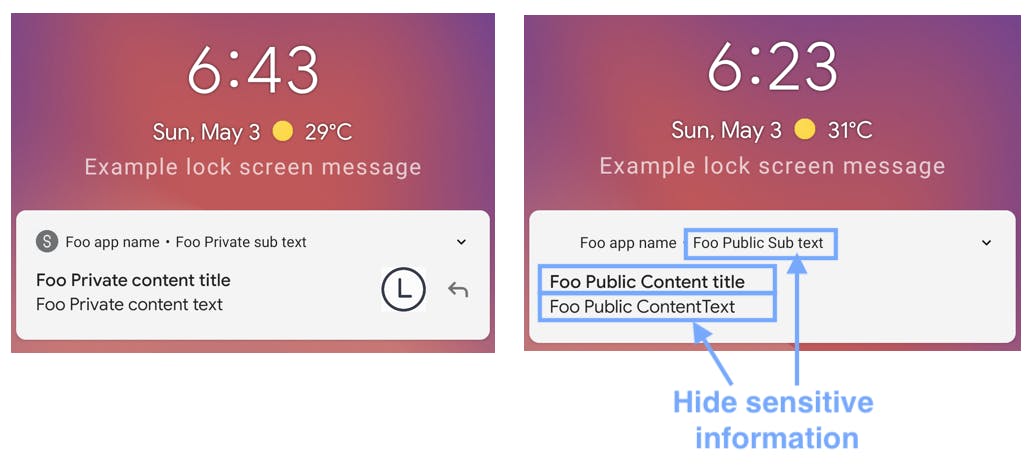
User privacy is the most important part in a notification. Everyone can see user’s lock screen without unlocking user’s phone. Developer should hide sensitive information or the whole notification when the screen is locked, e.g. bank statements and personal information.
val notification = Notification.Builder(App.context, CHANNEL_ID).also {
  it.setVisibility(Notification.VISIBILITY_PRIVATE)
  val notificationBuilder =
      Notification.Builder(App.context, CHANNEL_ID).also { publicNotificationBuilder ->
        publicNotificationBuilder.setContentText("Foo Public ContentText")
        publicNotificationBuilder.setSubText("Foo Public Sub text")
        publicNotificationBuilder.setContentTitle("Foo Public Content title")
      }
  it.setPublicVersion(notificationBuilder.build())
}.build()
Here are the 3 possible Visibility options:
VISIBILITY_SECRETSecurity level is the highest. Notifications are all hidden at the lock screen.VISIBILITY_PRIVATESensitive information in notification is replaced by another set of public information which can be set bysetPublicVersion(publicNotification: Notification), see line 4–9.VISIBILITY_PUBLICAll information are displayed freely. The look at the lock screen is exactly the same as the heads-up banner notification. See the left side of the figure above.
User interaction — Click & Dismiss notification
val notification = Notification.Builder(App.context, CHANNEL_ID).also {
  val intent = Intent(this, FooNotificationActivity::class.java).apply {
    flags = Intent.FLAG_ACTIVITY_NEW_TASK or Intent.FLAG_ACTIVITY_CLEAR_TASK
  }
  val REQUEST_CODE = 111
  val pendingIntent = PendingIntent.getActivity(this, REQUEST_CODE, intent, PendingIntent.FLAG_UPDATE_CURRENT)
  it.setContentIntent(pendingIntent)
  it.setDeleteIntent(pendingIntent)

  // Dismiss notification when notfication is clicked
  it.setAutoCancel(true)
}.build()
Android catches two kind of user interactions on notification, one is clicking on a notification and one is dismissing a notification. Their handlings are the same except one is set by setContentIntent(pendingIntent: PendingIntent) (line 8) and the another one is set by setDeleteIntent(pendingIntent: PendingIntent) (line 9).
PendingIntent is a reference pointing to a token maintained by the Android system. Thus, it will still be valid if the application is killed by user and can be broadcasted at some moment in the future. There are totally 4 functions for initialising a PendingIntent:
PendingIntent.getBroadcast()— When a BroadcastReceiver should be notifiedPendingIntent.getActivity()— When an Activity should be launchedPendingIntent.getActivities()PendingIntent.getService()— When a Service should be started
By default, Notification will not be dismissed when it is clicked by user at the Notification Drawer. Therefore, developer has to call setAutoCancel(true) (see line 10) in order to hide the notification from Notification Drawer after user is redirected to your app for further action.
Add Extras (information)
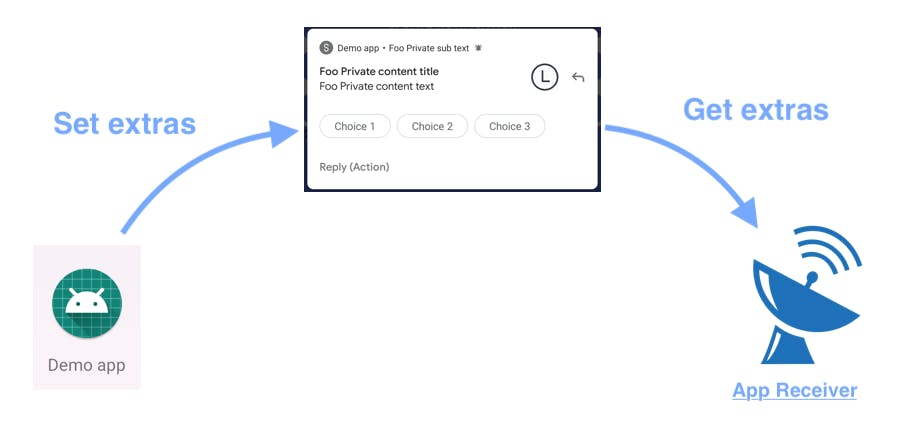
It is possible to pass extra information to a notification and then retrieve it back later, e.g. at the BroadcastReceiver.
val notification = Notification.Builder(App.context, CHANNEL_ID).also {
    val bundle = Bundle()
    bundle.putString("KEY", "VALUE")
    it.setExtras(bundle)
}.build()
val notificationId = 100
notificationManager.notify(notificationId, notification)
We can first encapsulate the value through Bundle at the line 2 -3 and then pass it to the setExtras method.
val notificationId = 100
val notificationManager = context.getSystemService(Context.NOTIFICATION_SERVICE) as NotificationManager
val statusBarNotification = notificationManager.activeNotifications.firstOrNull {
  it.id == notificationId
} ?: return
val notification = statusBarNotification.notification
val retrievedValue = notification.extras.getString("KEY")
At later stage, e.g. BroadcastReceiver, we can retrieve the data back by getExtras() method at the line 7.
Add RemoteInput and Action
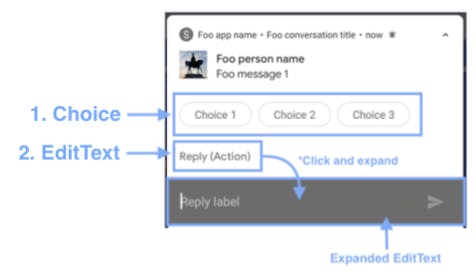
RemoteInput and Action are UI kits that can allow user to quickly response to a notification. RemoteInput are a list of Button with pre-defined action and Action is one which can show an EditText for user to input a String without opening the app.
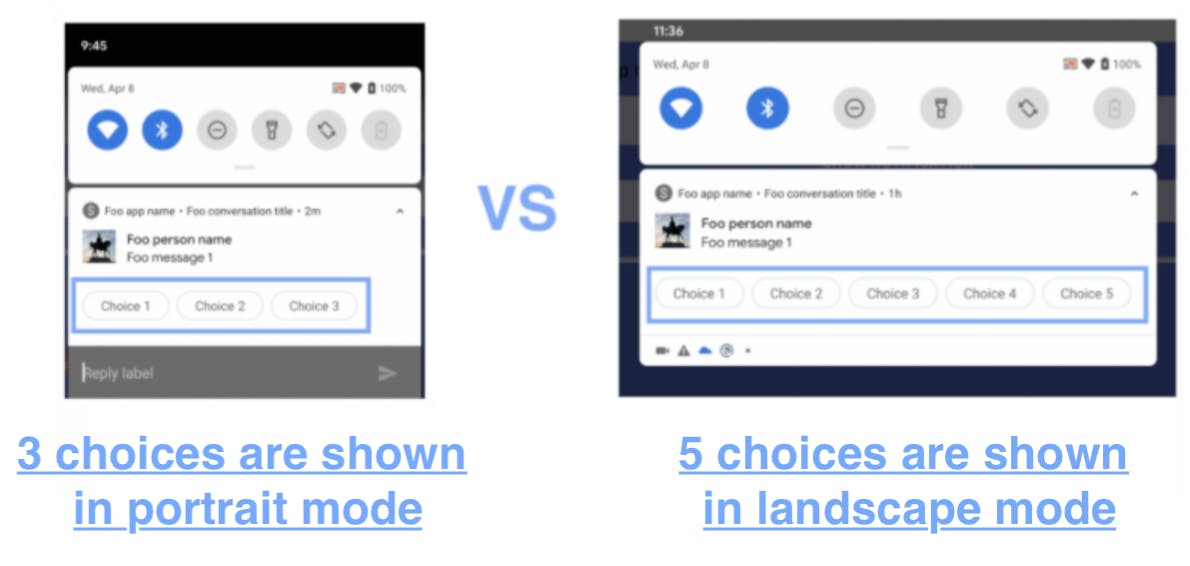
Due to limited amount of space, some choices could be hidden when there is no space for displaying them, e.g. the “Choice 4” and “Choice 5” are hidden in portrait mode but shown in landscape mode. Therefore, we should limit the number and the title length of each choice to prevent from being cropped by the system.
Please refer to the “Part 4) RemoteInput in 5 steps” in the following article for more details on RemoteInput.
Add Progress bar

val notification = Notification.Builder(App.context, CHANNEL_ID).also {
  val MAX_VALUE = 100
  val progress = 50
  it.setProgress(MAX_VALUE, progress, false)
}.build()
Progress bar is usually used for showing the progress of a long running task, such as downloading an app from Play Store or uploading a file to server. Its usage is simple and straight forward.
Set notification time
It is usually a misunderstanding that the time shown at the notification item must be the time when it was emitted to the Notification Drawer. It can be manually changed with the function of setWhen(timestampInMillis: Long). The when property of notification item is used for ordering the notifications in the notification channel.

val ONE_MINUTE_MILLIS = 1 * 60 * 1000
val notificationBuilder = NotificationCompat.Builder(this, "foo channel id").also {
  it.setWhen(System.currentTimeMillis() - ONE_MINUTE_MILLIS)
}.build()
The use case could be the handling of racing condition in a messaging app. Imaging that the WebSocket is listening to an event from server, but due to the processing time between text and image messages, the order of message sent and the order of message received are probably different. In other words, text messages arrive before image messages do even image messages were sent before the text messages.
Moreover, developer can show or hide the time by calling setShowWhen(isShow: Boolean).
Show a timer
The when property can also be set to a timer or chronometer with respect to a specific time. setUsesChronometer(true) would treat the time shown as a timer with respect to the time set by the setWhen(timestamp: Long).
val ONE_MINUTE_MILLIS = 1 * 60 * 1000
val notificationBuilder = NotificationCompat.Builder(this, "foo channel id").also {
  it.setWhen(System.currentTimeMillis())
  it.setUsesChronometer(true) // Default is false
}.build()
At the same time, the when property can be set to some moment in the future. This case would change the time from a count up timer to a count down timer.
Count up timer can be used for showing an elapsed time of an ongoing phone call and a count down time can be used for showing the remaining time of a scheduled task.
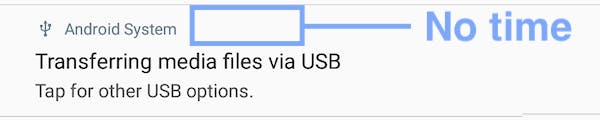
In some special cases, such as Android System notification, there is no need to show the time for a long running process. The time string can be hidden by calling the setShownWhen(false).
val ONE_MINUTE_MILLIS = 1 * 60 * 1000
val notificationBuilder = NotificationCompat.Builder(this, "foo channel id").also {
  it.setShownWhen(false)
}.build()
There is a limitation on the when property. The time format is not customisable and the default one is HH:mm:ss.
Dismiss Notification
val NOTIFICATION_ID = 100

val notificationManager = getSystemService(Context.NOTIFICATION_SERVICE) as NotificationManager
notificationManager.cancel(NOTIFICATION_ID)
notificationManager.cancelAll()
If your app supports authentication, it is usually necessary to cancel all existing notifications when user logs-out the app. Developer can call the cancelAll() function of NotificationManager to dismiss all notifications easily.
........................................................................................
Summary
- Notification has totally 9 widgets that can be customisable
- MessagingStyle, BigTextStyle, BigPictureStyle, InboxStyle and MediaStyle are those Android provided notification style for showing a better layout for user.
NotificationChannelhas been added since API 26 and developer now must set this to prevent runtime crash- Notification icon should be designed with transparent pattern in order to show the details parts even covered by a layer of tint color
- User privacy must be a great concern and should be handled as carefully as possible. Android can hide the whole notification or hide the sensitive messages depends on the user’s needs.
- Both click and delete notification action can be caught by Android
- Data can be sent to notification receiver by Bundle
- RemoteInput and choices are great widget for user to response to notification without opening the app
- Progress bar should be added when there is a time consuming task running at your app
- The time of notification can be customised to anytime and shown a chronometer.
- Dismiss all notifications when user logs out from your app
Reference
- Android Custom Notification
- Android Notification Channel As Deep As Possible — ITNEXT
- Android Notification overview
- Android NotificationBuilder documentation
You are welcome to follow me at Twitter@myrick_chow and Medium@myrickchow for more information and articles. Thank you for reading this article. Have a nice day!